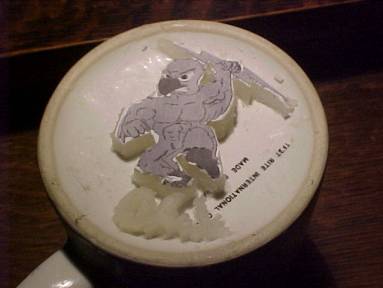
Below, you’ll see a botched job one of my students did with a pattern we have in
the shop. We could speculate about what went wrong for him, but I am really just
showing what my principal had in mind when she asked me for a coin. She remembered
that we have a pattern for a big coin. She said that the head of our school board
would be flipping a coin before homecoming. She thought a big coin would be nice,
and indicated with her hands that she remembered it being about 3 inches across.
She wondered if we could have a student make one that says Chix on one side and
Dux on the other. I agreed that we could do it. That’s how this got started.
I printed out a logo the right size to fit on the inverted coffee mug.
Then I cut the wax away. This took about an hour.
That was Saturday night.
The next day, Sunday, I spent about 5 hours whittling away wax that didn't look
like a chick.
This was a lot harder than I thought it would be.
I could see that this might work. But I was not satisfied with the quality of
the detail. I have a lot of respect for real artists. I think they would have been
done with both by now.
Then, I started the Dux logo.
I was surprised how difficult the block letters were.
I kept working on the patterns, when time allowed, until Wednesday, October 5. I
planned to pour the brass Thursday afternoon. During the day on Wednesday, I replaced
the thermocouple in the kiln and got that working. Some heating elements were burned
out. I had replacements, but decided not to tackle that job yet. I also welded up
a small rack to hold the flasks up off the kiln floor. And I welded up a couple
flasks, 8” x 8” x 5” deep, out of ¼” plate.
It’s very difficult to discern the surface of the wax in these pictures, just as
it is in actual full view. The wax I have is translucent. Dirt from my fingers would
mix in, and cracks in the wax would show white through the clear parts. I was constantly
rotating the patterns under the light to try to get a fix on the surface. I was
surprised how difficult those block letters were to produce.
Around 11pm, I mixed the ceramic. I discovered before, with a test pattern, that
simply inverting the mug and pressing into the mud would trap air under the cup.
Even a small bubble would be a big problem. I averted this bubble problem thusly:
I poured wet investment onto the patterns, as they are positioned above. I tapped
the mugs several times to jar bubbles loose from the patterns. I allowed the mud
to set for about an hour. Then I filled the flasks with investment and mixed that
up with water. I took the mugs with the half-inch or so of set up investment attached,
and inverted them into the flasks. I allowed this to set for another hour. So, about
2am I pulled the mugs out of the investment to see what kind of impression I had.
I was pleased.
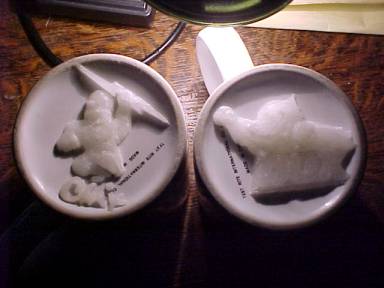
This picture does not show detail as clearly as you would see in real life, but
it turned out adequately, I thought. You can see a couple small bubbles, but I could
chip off the resulting metal after casting.
With the one below, you can see that some of the wax pulled off and stayed in the
mold (text and part of the lightning bolt). I figured I could just burn this out
and that I wouldn’t need the wax pattern after my pour.
I took these to Zeeland on Thursday morning and heated them in the kiln at 300º.
I expected to have to cook at this temperature for at least five hours, to dry out
the molds. It would take a little longer to burn out the wax. So, I was expecting
to put off pouring the metal until Friday. After a couple hours, I looked inside.
What I saw stunned me.
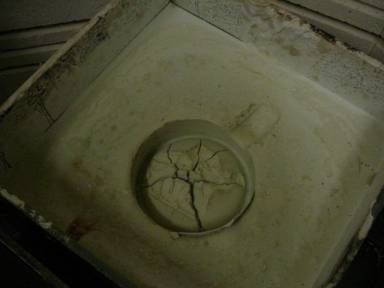
It was like an evil trick. I've had cracks before, but only with blocks that were
so hot for so long (30 hours) that the steel burned away around the mold. (I usually
use 18 gage). This was only 300 degrees for only two hours, and the cracks were
only in the most critical place.
Frustrated, stunned, baffled. I was too tired to panic. (Three or four hours per
night is what sleep I've been getting lately.) I might have time to rework the wax
and try again, but I needed to know what went wrong.
At first I suspected the investment. But that didn't sound reasonable. Maybe I used
more water this time, but I couldn't think of anything else I did differently. Hmmm...
After an hour or so, I realized what caused this problem.
It was the layers I produced by mixing the ceramic twice. They didn't adhere! The
thin layer I laid on the pattern buckled loose. Of course!
Even though time was running out, and I wouldn't be able to do any more work on
this project until the weekend, I was much relieved to know what went wrong.
I picked up a can of silicone spray. I'd try that as a release agent. I work late
in Grand Rapids on Friday, as I did on Thursday. Saturday, I work in GR from noon
till 2:00. But I found time that weekend to rework the wax and make new molds.
nothing's easy.
Anyway.. the problem I had with my investment involved layers. I wanted to avoid
them, but I still had the problem of cupping air under the pattern. My wife, Michelle,
came up with this idea, (below). I sunk the cups into dirt so that the investment
wouldn’t cover the cups entirely. (I dug 3’ and couldn’t find sand at home.)

I thought the draft (angle the sides make with the vertical) would allow the mold
to fall right out, when inverted after setting. That didn’t happen. I had to cut
the pails. I learned that pails from ACE Hardware have a heavy wire around the mouth,
under the plastic.
I tried something else different. I sprayed silicone onto the pattern before applying
the mud. I wanted the wax to release easily. It didn’t help.
You can see that the wax stuck in the mold. I dug this out to save it, just in case.
But it wasn’t worth it. The silicone made the wax hard to work with.
The duck turned out pretty good – for a second try. These are both second tries.
I wouldn’t have expected the wax to do more than a single mold.
I was going to race down to Zeeland on Saturday, but decided to wait until Sunday.
I had time. The homecoming game wasn’t until Friday.
On Sunday, I set the blocks into the crucible. I was a bit uneasy because the blocks
were not inside flasks. I remember that this stuff cracks when it gets hot. I thought
I would try to keep the temperature down. After all, I wasn’t burning out any wax.
I only wanted to dry the blocks out. I figured that since the inside of the blocks
wouldn’t get any hotter than 212°, as long as there was water inside, setting the
kiln for more than 300° would be unnecessary. So that’s where I set it, and left
the blocks overnight. (When I burn out wax, the temperature goes to 1,500° for more
than a day.)

You see (above) the crane I made three years ago for my pig Peg. It’s on wheels.
I’m using it to hold the kiln door open. Some of the hardware and most of the heating
elements to the kiln have been ruined by thermal shock. I understand that opening
the door to a hot kiln is destructive. It is also probably not right to keep turning
the thing on after it shuts itself off, as it does when it reaches its set temperature
(for me, usually above 1,500°).
When I retuned on Monday, I kicked the temp up to 500°. At the end of the school
day, I figured they must be dry. I was, however, a bit uncomfortable about color.
I remembered this stuff turning white, and mine were darker than that. I figured
that the dirt might have discolored things. I discovered the truth the hard way.
I got a student (Bill Machiela) to help me pour the brass. As soon as we filled
the first mold, I could tell we had problems. The metal was agitating. Steam was
bubbling up into the metal. I had us spill the rest of the metal into billets and
put the other mold back into the kiln. I raised the temperature to 750°.
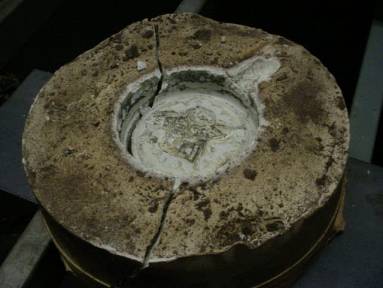
You can see the sad results below. The black spots are holes left by steam. The
one behind his head goes almost all the way through. So, I needed to make a third
mold for the duck. This was Monday.
The mold cracked with the hot metal, but didn’t spill any.
When I left school for my grad class, I looked into the kiln. I noticed the mold
was turning white. I was glad to know what the problem was, and that I could trust
that dark molds were not dry.
After my evening grad class, I went home and (at 10 PM) worked up the wax for another
duck pattern. Working with that silicone was a problem. I wished I hadn’t tried
using it. Then, I went outside and mixed up another batch of investment in another
pail. In the morning, I loaded all my stuff. In case of another problem, I wanted
to have everything at school.
On Tuesday, I put the new duck mold into the kiln with the chick mold, and turned
the heat back on to 600° (the kiln shut itself off). I waited until the end of the
day to pour the chick mold. I was a bit concerned because small parts of the mold
looked dark. But I reasoned that it couldn’t possibly be damp after two days in
the kiln at temperatures ranging up to 750°. I talked about it with some students,
but decided to pour. You can see that I had the same problem, although not as bad.
There are holes, and a lot of the detail is missing.
I cranked the heat up in the kiln to 1,500°
I was feeling desperate. I needed to make another chick mold, and the wax was getting
real hard to work with. I also was afraid of cracks at the high temperature.
I thought I would reinforce the next mold, to be safe. I bent up some expanded metal.
Then I put it in the pail. This looked smart. You can see the dirt in the wax –
I’ve reworked this too many times. It looks worse each time.
I called Michelle (about 8PM). She thought I would be smart to make a spare duck
mold too – in case something happened to the one in the kiln. I agreed. It would
take me another hour or two, but I better do it. I decided to make a spare chick,
too. I would mix the mud for both at the same time.
While working on the duck wax, I noticed that a crack developed along the top of
the new chick mold. I didn’t realize what was going on, though, until I cut the
mold out. The “reinforcing” actually caused the mold to break. And it wasn’t even
hot yet.
You can see that hairline crack entering the light part, to the right. This looks
bad.
I had already thought about making yet another chick mold. But the wax is getting
real bad, with all that dirt and silicone.
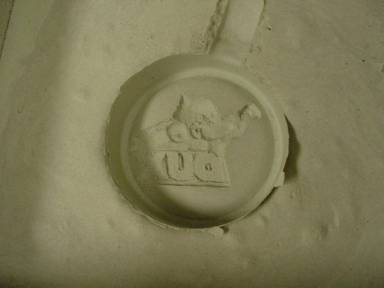
This is what was left on the mug.
I got it back together again. I mixed up mud for another mold. I’m loosing track
of how many this is. Let’s see.. there’s a duck mold in the kiln, and I’m making
another one for a spare. Then there’s this messed up one and I need a spare now
for this too.
I reworked that wax. This is getting hard.
I was out of pails, so I made one. I’m using a spot welder, below.
Right after pouring the mud into the last two molds, I ran to Lowe’s. I got there
just as they were closing (10 PM) and picked up a bag of hose clamps.
This might help.
This actually looks better than anything I’ve tried. I probably should have done
them all like this.
I cut the steel off with a plasma cutter. That was stupid. I got the cup real hot
doing this. It fused with the investment and I had a lot of trouble getting it out.
The wax all came off in the mold. And it was warm. It wasn’t going to be any more
use. So this will be my last chance, (didn’t I say that a week ago?)
<
I took a look at the duck I still had in the kiln. After heating it up, (and opening
the door) I noticed cracks. I wanted to put some hose clamps on it, so I let it
cool and took it out. Then I saw lots of cracks. It was just too fragile to mess
with. I put it back in and decided to try and see what happens. I do have a spare
now.
This is the same cracked mold. There's a crack around the ring the mug made, to
the left, but you can't see it in this picture. I could tell you what the dark color
around his glove means.
This is the last duck mold.
The same mold, with wax removed. (I sure got a lot of miles out of that wax!)
The last duck mold has no reinforcing, so I put clamps around it. I'm afraid that
they will dig in and break the mold as it heats. I put steel shims under the turn
buckles.
Here's my last duck mold, again, ready for the kiln.
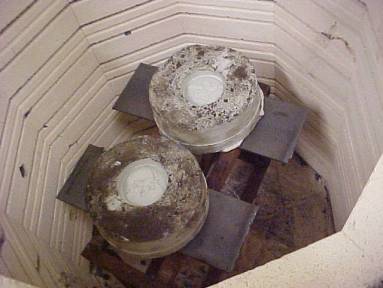
I had to make another rack because I'm cooking four, not two, molds.
Here we are, all loaded up.
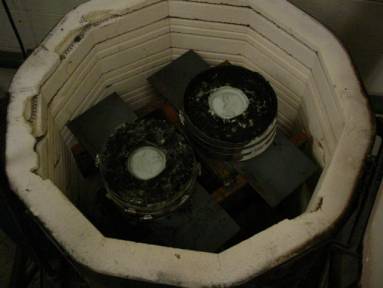
This is Wednesday. All I'm doing today is cooking those blocks. I expect the heating
elements to burn out about 3pm. Then I'll have to scramble all night, trying to
wire a kiln that's too hot to touch.
I wonder what other people do for fun?
So… I had a hard time getting out of bed on Thursday. I expected another long, stressful
day. I had arranged for a substitute for the evening in GR, so I could stay at Zeeland
and finish the coin. This was my last night before Homecoming.
Actually, I had entertained the idea of coming home after school and going to bed,
and then getting up at 3 AM to finish the coin. That way I could dry the molds in
the kiln a bit longer. Michelle helped me out of that idea. I might need more time
after pouring and should probably start sooner.
When I got to school in the morning, I glanced in the kiln. I didn’t want to let
cold air in and chance cracks so I took a quick peek. The kiln was actually quite
cool. After shutting the door, I realized that the mold I saw looked pretty white.
That was very encouraging. Then I wished I had looked closer for cracks. I didn’t
want to open the door again. What difference would it make anyway? I turned up the
dial to 1250°.
It took quite a while to get up to temp and shut off. I probably should have switched
out those burned elements. After school, I turned it to 600° and was surprised that
it had to work about 20 minutes to get there. The thing must cool down fast. I wanted
the molds to be at 600° when I poured. I would turn it on at 600° again when I started
to cook the brass.
I planned to pour around 9 PM. That way the molds would have a good chance to dry
and I would be able to machine the castings and weld them before too late. So, then,
I would start the furnace around 8 PM. I took an hour nap in my car after school.
When I came back in, I made a ladle. I couldn’t pour from the crucible, like I always
do, because I would be alone this time. I cut some square tubing and welded it to
some flat steel.

Then I thought it should have a spout.
The plasma cutter is fun to work with. It cuts steel just like a razor cuts paper.
Welding is fun too.
This looked good. But it actually didn’t work so hot. It dribbled the metal out
too slow. I was afraid the little dribbles would freeze before the mold was filled.
After the first cast, I just spilled the metal out the back. That was faster.
While I was waiting for 8:00, I started to machine the ugly, screwed up slugs. I
wanted to practice and see what problems I might have. Actually, things went pretty
smoothly on this part.
Above, you can see that I switched the chuck jaws around to hold on to the bigger
diameter metal. And that I’m using parallel bars to hold the slug away from the
chuck. You wouldn’t want to turn on the machine with them in there.
I got the slugs as thin as I could and matched them up. Next step is to stick them
together. I thought about epoxy, but welding them would be best. I’m not real experienced
with welding brass. But it’s not as bad as aluminum. It’s rather violent when it
gets hot. I learned before that it’s best to ignore the noise and smoke and flying
stars, and feed the filler metal in fast. I’m going to need to weld my pig Peg,
so I thought I better practice here and now.
I welded up a cookie sheet, of sorts, and poured some brass into it. I did this
the other day. Tonight I sheared it up into practice pieces and some filler metal
sticks. I have brass filler rod, in the shape of heavy gage wire, but, when I weld
my pig Peg, I’ll want the filler color to be exactly the same as the casting. Tonight,
I want to see how these shears work in place of the filler rod. I was pleased at
how well it worked.
This is what the cookie sheet looked like after pouring hot metal into it. I used
this side for 3/8” thick sheet of brass. The other side gave me a 1/8” sheet, for
the filler metal. You can sort of see how deformed the cookie sheet got from the
heat. I probably won’t use it again for anything.
Like I said, I was pleased with how able I was with the welding. I stuck these two
pieces together in an edge joint, and figured that was easy enough. I was confident
enough to go right for the coin.
So, here’s what the practice slug looked like after welding and sanding. I’m satisfied.
I’d been stalling long enough. My stomach felt sick from the prolonged stress. I
tried not to think of what was coming next, and to forget about how important this
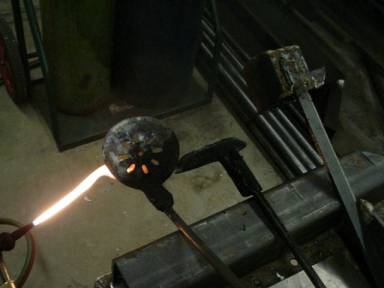
had become to me. I loaded the crucible with the prettiest brass I could find and
started cooking.
After this melted, I added more. I didn’t want to have any problems getting that
ladle full of pretty metal. I didn’t want to get a cup full of slag because the
thing wasn’t full enough. The slag floats.
When you add metal to an already melted charge, you need to be careful. Any moisture
can cause an explosion. Moisture, just from the air, will be found in abundance
in the slag that freezes on top of the bars we pour. I always hold the metal over
the mouth of the furnace for a brief time. It doesn’t take long. And I make sure
to suit up with leathers.
What I’m doing here is coating the steel skimmers and ladle with soot. If you don’t
do this, brass can stick to the steel and it’s very hard to get off. These skimmers
are new. They cost almost $50 each. You only use them once in the metal, and then
set them aside until you coat them again with soot. I used each of them twice. I
wanted to get as much of the slag off as I could.
Right after this, I was ready. It was time. I felt dizzy walking across the shop.
I tried not to think. I carefully set the molds out and started dipping and pouring
the hot metal. I was surprised at how much force it took to submerge the empty ladle
in that heavy brass.
Below, you see some hot metal. I was too late in getting the camera to show you
radiation. It always looks so cool when the stuff radiates, all yellow, and then
red.
I had a hard time getting myself to look at the results. I was too afraid. I needed
some good news. I figured the likeliest place to find it was the mold that had been
in the kiln the longest. This was the one with the cracks in it. My problems had,
up till now, been from water, not cracks. I had notice the metal agitating in that
particular mold, after pouring, but I couldn’t imagine that it would still be damp.
I thought that maybe gas was escaping from a crack. That couldn't be good, either.
But, it had been in that hot kiln since Tuesday morning. This was Thursday evening.
I never suspected moisture.
But you can see that I had big voids from steam. My heart sunk. Since I was sure
that this was as good as I would get, I had really no hope left. I figured the rest
of the night would be a clean up job.
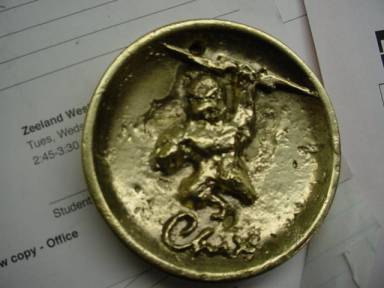
This is the second casting I looked at. Although this is far from the quality I
expected when I started this job, it was a big relief to see the duck and lettering
so clearly. There are voids and detail is missing, but I can live with this. Now..
how about the chick?
I picked the chick mold that I thought was most likely to be successful. I picked
the one without the reinforcing and big crack. My heart sunk again. We have more
deep voids and lost detail. I lost all hope again, and felt rather panicky. We were
so close.
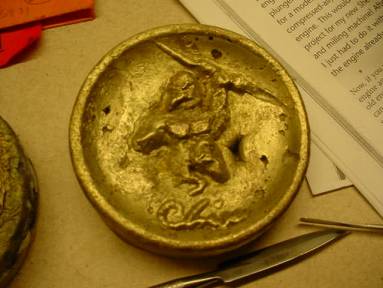
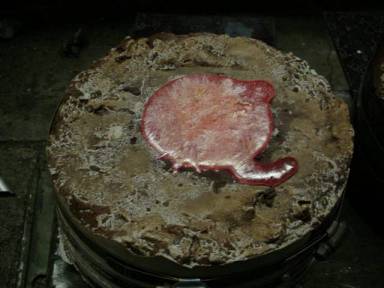
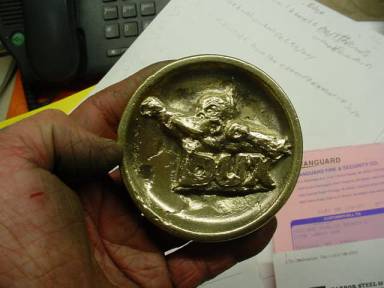
This last one came from the mold with the reinforcing and the big crack. I was relieved.
Although I would never show off a casting with all these flaws, you can make out
the logo. At last, I had something. I would be able to give this to my principal
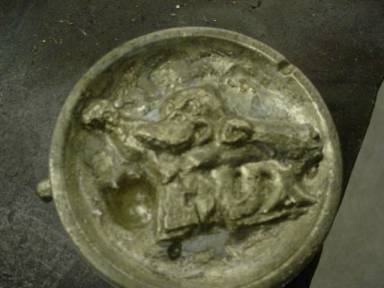
I spent the next couple hours machining and welding. Then I polished the thing.
It doesn’t look good, like I wanted, but it will work. I can go home.
Here's what happened. At 7:00 AM on Friday, I emailed my principal saying that I
had a coin for her, but that I wanted to work on it until the end of the day. Then
I got a student with aptitude to produce several sand molds, using the waxed up
original as a pattern. We cast them and laid them aside. I ran the original down
to my principal, and left the new ones in the shop. After school, and after the
homecoming pep assembly, I returned and cut the gates off and polished the best
looking one. It wasn't bad at all. It was yellowier and, although lost more of the
detail, lacked the ugly voids. I found the principal and gave her this one, too.
I said that she could decide which one looked better and use that.
She said that the school board president had called early and wanted the coin so
that he could practice flipping it before the big game. As soon as I gave her the
first one, she sent it off to him.
I thought that was cool, that the president of the school board was asking for the
coin, and that the principal rushed it to him. It was an important thing. If I had
failed completely, like I almost did, it would have been embarrassing. But this
turned out ok. I'm quite relieved. I wish the quality was better, but I'm just a
shop teacher and an amateur artist. So what the heck!