My Cat Clayton
June 2006:
I want to make the piggie bank. I still have the wax pattern from last summer, and
the flasks. So I measured the flasks and calculated that I need about 1,000 pounds
of investment. That'll be $850, at the price I've been paying! I read that plaster
of Paris will work, mixed one part to two of beach sand. That will bring the cost
way back down - to about a hundred bucks. What a difference! I think the stuff I've
been using is real high quality, for jewelry or something. With the cost, and the
time it took to make that wax pattern, I want to be sure I'm doing things right.
I want to try a smaller project first.
Since Michelle's cat died, I've been talking about casting a marker. I think it
would be cool to turn our yard into a sculpture garden. So now I'm planning to do
a hurry-up job of a cat. With a cat, I could also get some practice with the core.
I've never cast anything with a core before. (The core is the inside part of the
mold that makes the casting hollow.)
I need a wire frame to hold the clay up, and to keep the tail and legs from breaking
off or sagging. I found some 3/16" rod in the garage, leftover from a physics project.
I was pleased with how fast this went together. (I used a MIG welder.) And I'm happy
with the way it looks. I can see the cat already! Sleek! Some day, I might put a
bird in his mitt. But for now, I just want to get a cat done. The stand is something
I made several years ago but never used. (Snoop's clay is still in the garage.)
The height is adjustable and the thing swivels. To save a few minutes, I made the
base in the form of a T rather than a Y. (A mistake.)
I just started padding clay on the limbs, to be doing something. I really didn't
know where to start. I'm using the end of that sawzall blade to carve the clay.
I wrapped paper and duct tape around it for a handle. I was surprised how long it
took, and how difficult it is to carve bands of clay from the slabs I bought (4
years ago). Carving the small pieces for padding also is time and energy consuming.
As I was finishing the body cavity, I printed out a couple pictures of Michelle's
cat Toby and asked her to pen a little note. (It made her cry.)
Then I slid the note inside.
Here - after 7 hours (!) I'm still just to adding material. It's been rather mechanical
up till now. It looks wrong, somehow, but I'm not real concerned with its form yet.
(A mistake.)
This is 4 hours later. My fingers are getting really sore. The skin is pulling away
from my nails and bones. It's not obvious, but I added a lot of clay. The thing
*is* getting heavy. It wants to tip over now. It did once, but landed on my chair.
(I should have made the legs of that stand differently - the base is a T instead
of a Y.) I'm faced with the fact that I don't know what I'm doing. I still need
to add a lot of clay, but I'm not certain exactly where to put it. I'm looking at
the real hard part of this job - the artistic part. I gotta get this thing to look
alive somehow.
I didn't do anything for a few days, except to discover that I made a mistake when
I hung the clay rings on the wire frame. After mindlessly padding clay on the limbs,
it became apparent that something was wrong. I needed to lower the "arms" below
the head but couldn't because the wires were already protruding from the top. The
way I had it, the arms were on both sides of the head. The thing looked like Superman,
levitating away in an unbelievable fashion.
It takes a long time to add even a half-inch to this thing. I just scratched some
grooves in it and felt miserable all day. I also went through all the cat images
on the Internet and in Michelle's photo albums, (literally, zillions). It turns
out that cats spend almost no time in this outstretched position. I couldn't find
one, although I realized that they need an elbow about as far forward as the face,
but underneath.
I took Zoey's favorite cork on a wire and prodded her in front of the video camera.
She's way too fat for a good model. But I did get some shots of her lying on her
side on the floor and stretching towards the cork. But, like I supposed, she only
reached out for extremely short times and then snapped back - like a blur.
FinallyI forced myself to sit at the clay and work it over. After a couple hours,
I concluded I was on the right track. (optimism in self-defense.) I was happy/relieved,
and quickly turned to something I know how to do. I started to install recessed
ceiling spots above Michelle's snack bar.
They're on a dimmer switch.
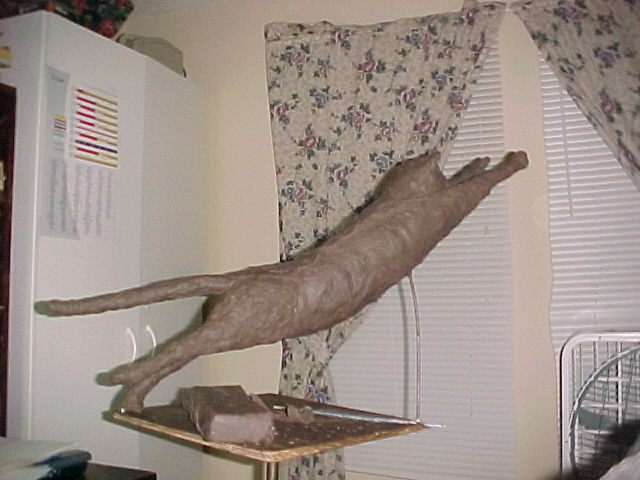
This is a pic of the clay. I've lost track of how many hours.
Well, I was happy enough after getting the cat above the wires so his head wasn't
stuck between his "arms". I figured it was time to work on his face. This turned
into a big problem.
I spent lots of time - possibly 8 hours over two days - just pushing clay around.
I'd pile it one and scrape it off. I'd build the snout up, then raise it, and then
lower it. Same with the ears. I cut one off and moved it back a half inch. Then
turned it. It was real frustrating.
It seemed like every animal but a cat would come to view; a bat, a pig, a mouse
(like Mickey). Michelle and I went out for dinner but I was not fun to be with.
Early one day I came in and cut both ears off and the snout.
Then I spent about a half our and formed a head the size and shape I thought was
right and carefully stuck on a snout where I though it should go. Afterwards, the
head looked small. I thought that I should keep it, though, and try to pad it out
a bit and whittle away some more at the underside of the body and legs, to bring
it to proportion.
I didn't want to invest any more time - and I wanted to avoid going to bed depressed
- so I left it there.
One minute I think I'm doing fine, then I worry I'll have to start over. It's much
harder than I thought it would be. It was taking me 5 days to work 5 hours. I would
add clay, then take it off. I would push it around and push it back. I moved the
ears again and again.
I've cut all the way through the original clay rings now at his belly. I would have
been smart to think about it before I started building him up in the first place.
This is how it looked on July 5. I took most of July and Auigust to finish my master's
project (yeah!)
Then, I looked back at Clayton. I really want to have that thing done. I had
lots of trouble with him - same old story. I changed the ears, neck, eyes, cheeks,
etc. and then change them again. I would always seem to find myself back where I
started. `Just like being lost in the woods. Hours would go by. Michelle would look
in and see the net result: no change. I decided to call it a cat.
As luck would have it, just as I made that decision, the armature (wire) broke.
I had been aware of the cat listing. In fact, it had rolled almost 30 degrees from
where it started. I hadn't considered how heavy that clay is when I made the off-center
support. (I did it that way to save maybe two minutes.) It snapped at the nut where
it's fastened to the board. It ended up falling against my desk (with a resounding
thud). I piled towels up and laid it upside down on the heap till morning. Next
day, I noticed a big crack across his tummy - where the clay is so thin (early mistake).
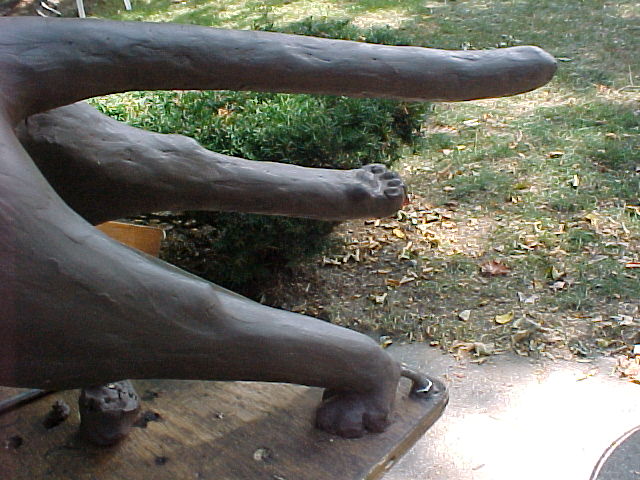
I took him to Zeeland and welded on another brace. I also welded some tubes at right
angles to slide in to the Tee base of my stand in order to sturdy that thing up.
The tubes just slide into the Tee part and are not fastened. You can see what I'm
trying to describe in the picture below.
By the time I got back home, Clayton was all banged up. His ears were flattened,
his face all chewed up, and so on. But what could I expect. (He rode in my bike
trailer.) But today, I have him back in shape and I mean it - it's done. It's done
cause I say it is.
From most angles it looks like a cat. It's not Toby (Michelle's lost pet) but I
don't have to hang a sign telling people what it is. I'm very relieved.
I plan to start with the rubber and plaster today - so I brought my radio outside.
There's no good DX, but I've talked with some dudes in Texas and Florida. You can
see the added wire to the right. The little tools under the cat are some of the
ones I bought way back, when I though I might want to get into this hobby. I bought
twelve at about ten bucks each. I use maybe four.
You can see the added wire here.
I didn't look at real cat feet when I did these - mainly because I was tired of
trying so hard. I figured that most people don't know what they look like either
so, if they look good enough to me, they'll be fine. (I thought of Garfield's stupid
looking feet. Nobody complains about them.)
I tried carving slit type pupils, but didn't like the way they looked.
I was going to smooth the thing like glass, using solvent, but decided to leave
it rough. What the heck. I'm going to get started now on the rubber and plaster.
I've learned a couple things from my screw ups with the pig last year. This should
go better.
Rubber Cat